Working with a Robot
Deploying the Software
Deploying the software to a robot means copying the directory Config (without the subdirectories Images, Logs, and Scenes) together with the executable bhuman and some libraries to /home/booster/Config on the robot. In addition, the network profiles in Install/Profiles are copied to /home/booster/Profiles. The latter does not automatically update the current network profile.
The software is deployed by executing the script Make/Common/deploy <configuration> <ipaddress>. The values for <configuration> are described in this section. The <ipaddress> is the one of the robot. There are many additional options:
All Options of the Script deploy
usage: deploy [Release|Develop|Debug] [<ipaddress>|(-r <playernumber> <ipaddress>)*] {options}
  options:
    -b                       restart bhuman
    -c <field player color>  set field player color to blue, red, yellow, black, white, orange, purple, brown, or gray
    -d                       delete logs
    -g <goalkeeper color>    set goalkeeper color to blue, red, yellow, black, white, orange, purple, brown, or gray
    -h | --help | /h | /?    print this text
    -k                       keep ip address for remote connection
    -l <location>            set location
    -m <magic number>        set magic number for teamcomm (0-255). Set -1 for random.
    -nc                      never compile
    -nr                      do not check whether target is reachable
    -p <player number>       set player number
    -r <n> <ip>              copy to <ip> and set playernumber to <n> (one -r per robot)
    -s <scenario>            set scenario
    -t <team number>         set team number
    -v <volume percent>      set Booster's volume
    -w <wireless profile>    set wireless profile
  examples:
    ./deploy Develop 192.168.5.14 -p 1
    ./deploy Release -r 1 10.0.5.14 -r 3 10.0.0.2
    ./deploy Release -i -nc -v 50 -w HSL_A
Without the option -nc, deploy will build the code before deploying it.
The standard method for deploying our software to the robot is the Deploy Dialog (see this chapter). It is a graphical frontend for deploy with a lot of additional functionality.
Using the Robot
Safety Instructions
There are two differentiations of safety, handling the physical robot and programming the robot.
- The height of the robot itself is the danger-zone. Human arms, hands, and the head are not allowed inside this height range. Standing upright next to a robot is permitted. The robot colliding with a human leg or foot pose no more danger than interacting with a small human child.
- The lower legs are very dangerous and human fingers can get stuck inside them. This might result in injuries or mutilation. No human body parts except for the legs are allowed near this area of the robot.
- The robot has a handle. It is only allowed grabbing it from below with the hand facing upward. Grabbing it from above is forbidden, due to the risk of the hand getting stuck in the robot's neck.
- The T1 has handles under its torso, which can be used to carry it for very short distances, but only when the robot is in prepare mode.
- It is mandatory to wear shoes when working with a robot.
- All programmed behavior must keep the mode transitions described above to ensure a safe usage of the robots. Breaking those rules is forbidden.
- All motion executions must be fully tested in simulation first, to reduce the risk of failure to a minimum.
- All motion executions must define the state in which they can be executed. Once outside that state, e.g. an undefined or not suitable torso orientation, the motion execution must stop.
- All learned motion approaches must ensure that all data that is used as input is verified.
Inactive
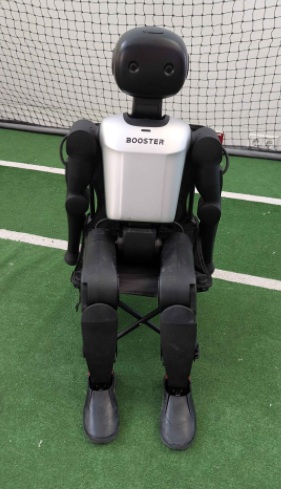
Whenever the robot is not used, it should be stored on its chair:
Warning
The cables at the shoulders should be directed toward the rear.
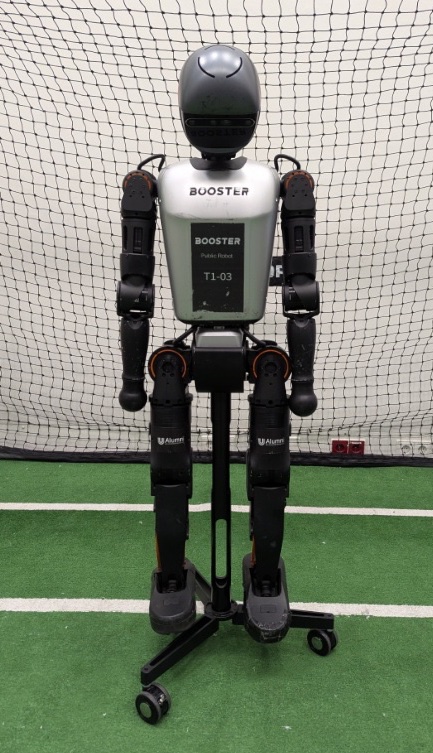
Whenever the robot is not used, it should be stored on its stand:
Warning
The cables at the shoulders should be directed forward.
Switching on a Robot
The robot can be turned on with a long press on the power button. After booting up, it will say "camera ready". This process can take up to two minutes.
Button and LED Interface
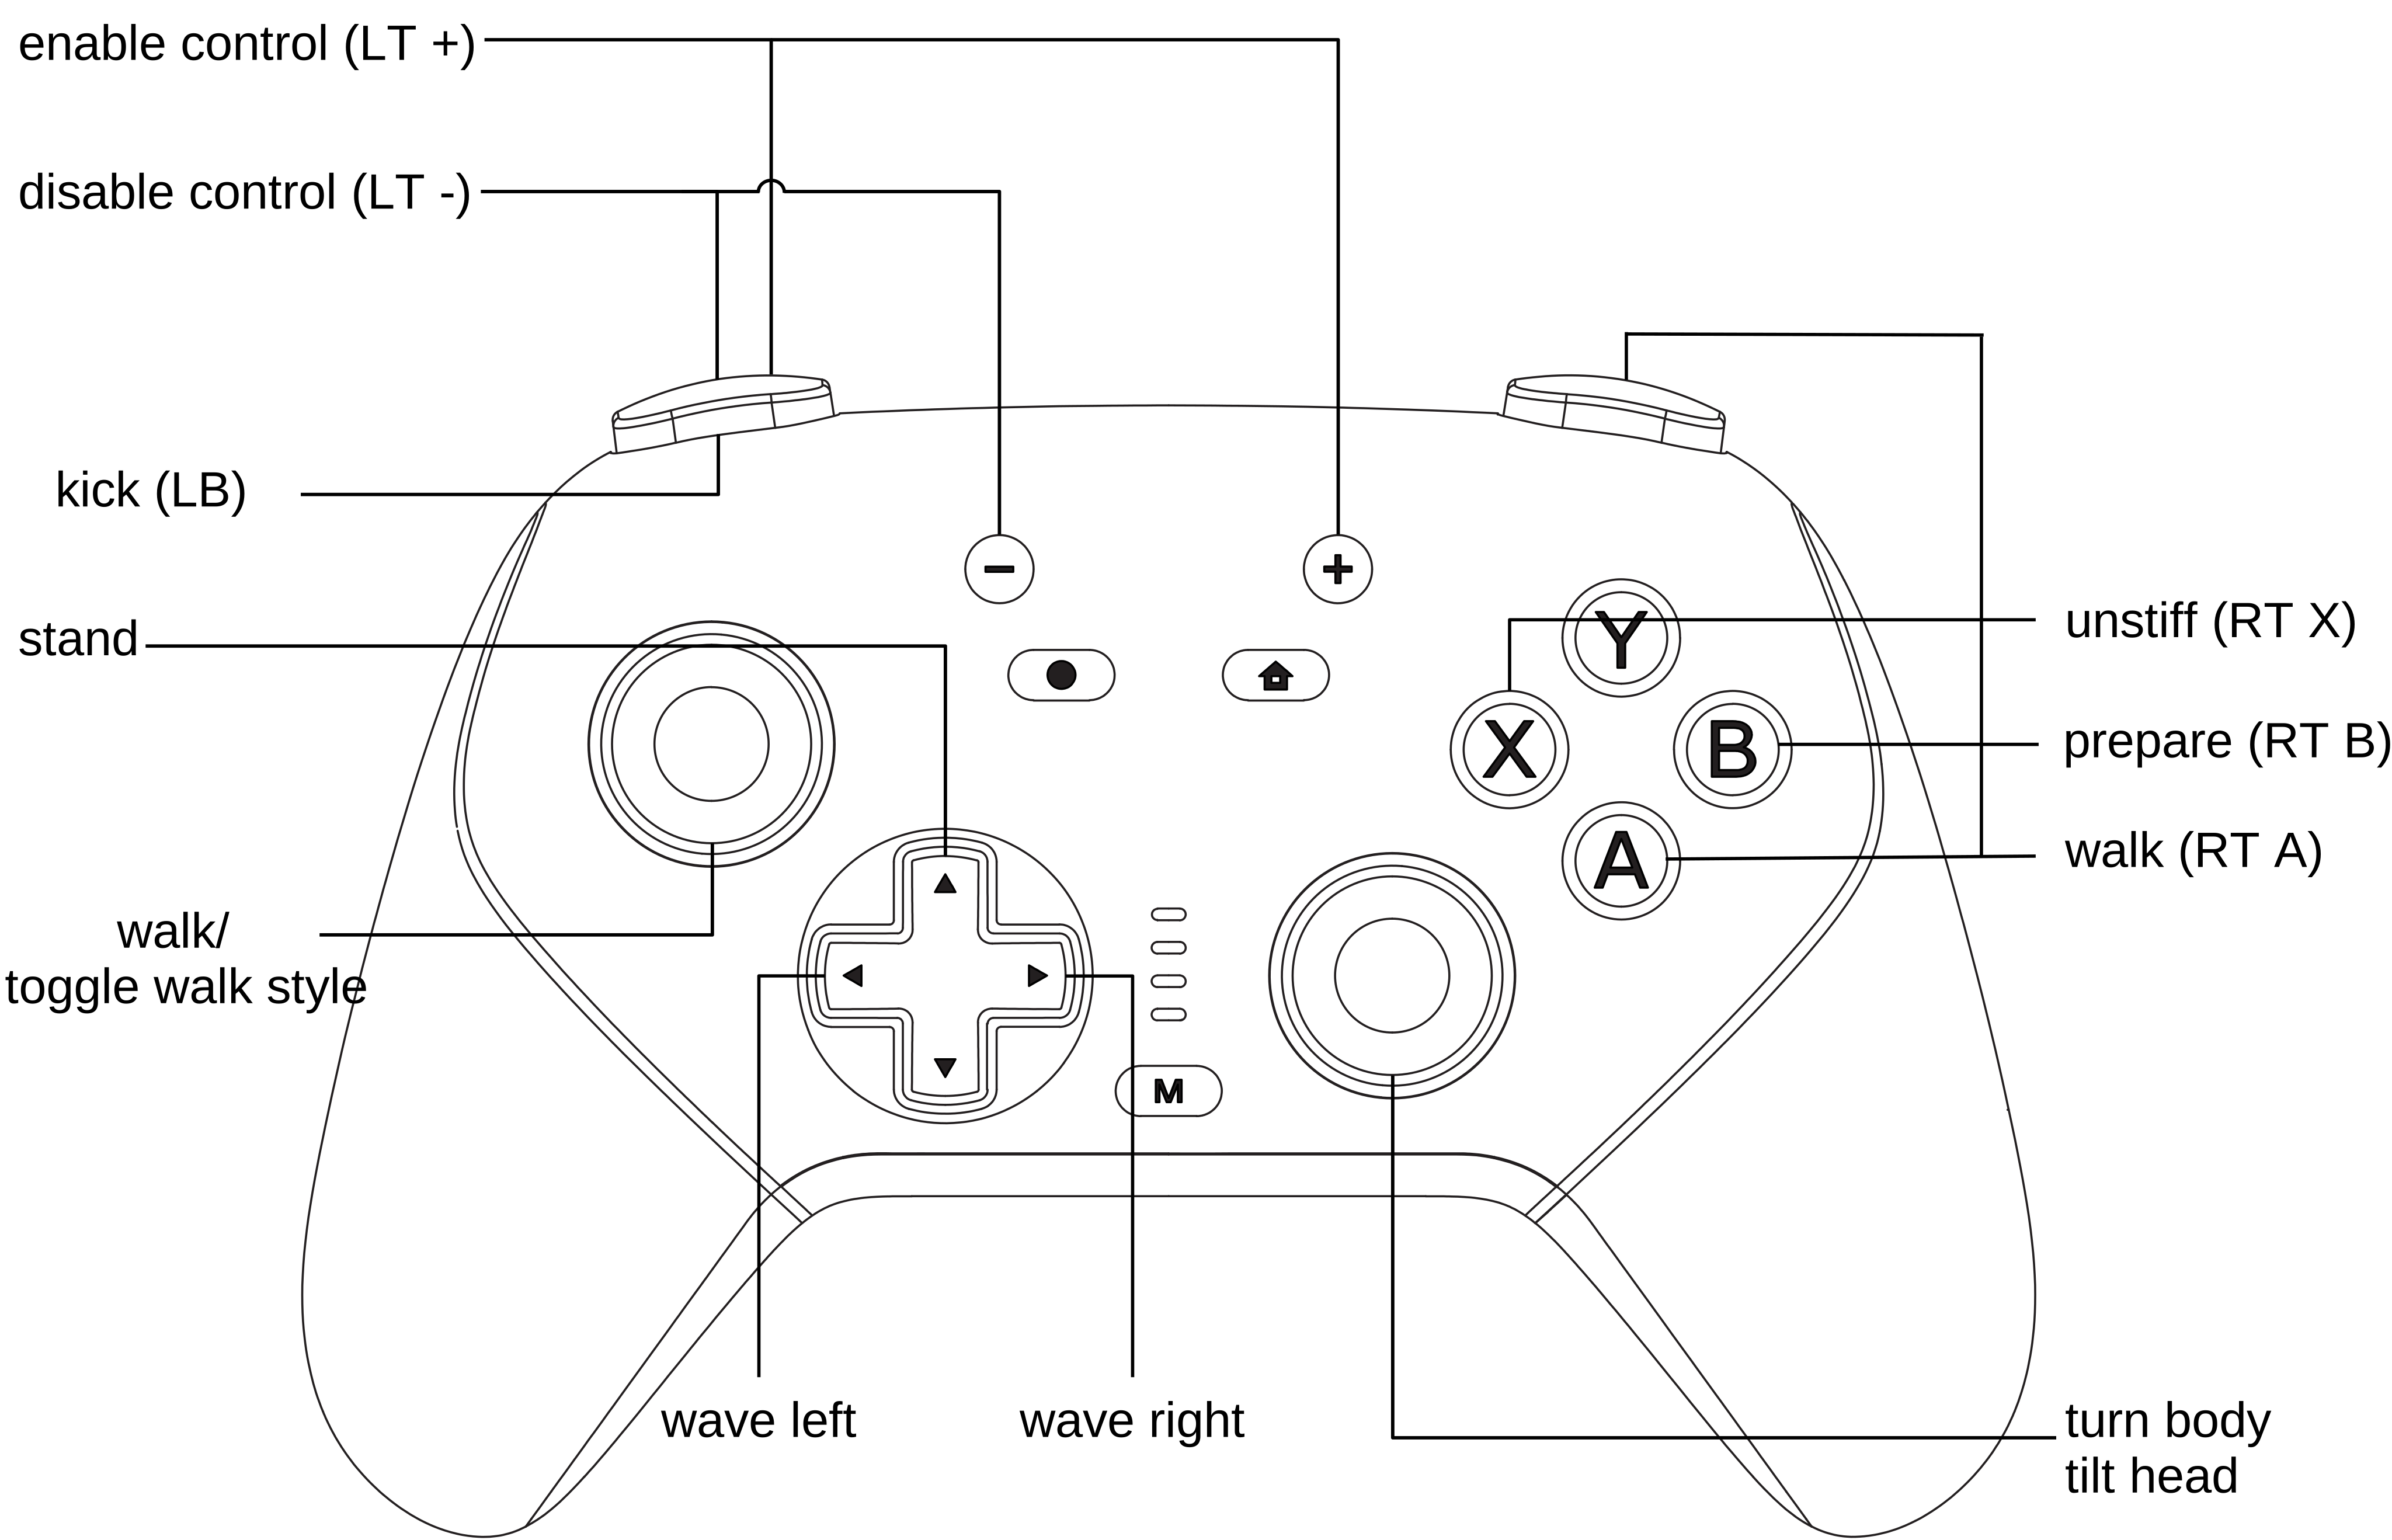
For the Booster K1, our software assumes that three buttons exist: F1, STAND, and WALK. For the T1, the controller that came with the robot is required, which maps button combinations to the K1 button interface. The same mapping also applies for the K1 controller. It can be found here. Except for the T1's emergency button, buttons have to be pressed for a longer time to switch to a less safer mode.
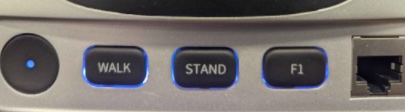
K1 and T1 robots announce mode changes acoustically.
In addition, K1 robots have a status LED on their back. The LED indicates the mode the robot is in:
| Mode | Effect | LED | Leave |
|---|---|---|---|
| Emergency | Booster's damping mode | Blue | Long F1 → unstiff mode |
| Unstiff | Custom damping mode | Blue, flashing | F1 → emergency mode Long STAND → prepare mode |
| Prepare | Unbalanced stand | Magenta | F1 → emergency mode Short STAND → toggle game state Long STAND + 3 × WALK → get up Long WALK → walk mode |
| Walk | Balanced motion | See below | F1 → emergency mode STAND → prepare mode WALK → toggle game state |
In the first three states, it is safe to carry the robot. The safest mode is the emergency mode. It is activated by pressing F1. In this mode, all actions of the regular B-Human software are ignored. Any button presses except for pressing F1 for a long time are ignored as well.
If the LED is flashing quickly in magenta, the walk mode was requested but the robot is still in prepare mode, because preconditions for that transitions are not met yet, such as being upright.
Danger
In walk mode, it is not safe to carry the robot. Also make sure not to press WALK for a long time while carrying the robot in prepare mode.
Warning
The robot will fall down when the motors are switched to damping mode. If not in an emergency situation, please grab the robot's handle first. Also hold the handle before switching the robot to the prepare mode, because it is unbalanced, and the robot will fall down as well.
In walk mode, the LED shows the current game state:
| Game State | LED |
|---|---|
| Initial or Finished | White |
| Ready | Light blue |
| Set | Yellow |
| Playing | Green |
| Penalized | Red |
| Calibration | Orange |
If the LED is flashing slowly in walk mode, gamepad control is active (see this section).
| Mode | Effect | Leave |
|---|---|---|
| Emergency | Unpowered motors | Release emergency button → unstiff mode |
| Unstiff | Custom damping mode | Emergency button → emergency mode Long RT+B → prepare mode |
| Prepare | Unbalanced stand | Emergency button → emergency mode RT+X → unstiff mode Short RT+B → toggle game state Long RT+B + 3 × RT+A → get up Long RT+A → walk mode |
| Walk | Balanced motion | Emergency button → emergency mode RT+B → prepare mode RT+A → toggle game state |
In the first three states, it is safe to carry the robot. The safest mode is the emergency mode. It is activated by pressing the emergency button. In this mode, all actions of the regular B-Human software are ignored. Any button presses on the controller are ignored as well.
Danger
In walk mode, it is not safe to carry the robot.
Warning
The robot will fall down when the power is cut to the motors. If not in an emergency situation, please grab the robot's handle first. Also hold the handle before switching the robot to the prepare mode, because it is unbalanced, and the robot will fall down as well.
Visualization of Mode Changes

In prepare mode STAND/RT+B and in walk mode WALK/RT+A, respectively, can be used to switch the game state from initial to penalized and then to playing if the robot is not connected to the GameController application. Further presses will switch back and forth between penalized and playing.
To prevent damages to the robot itself a restrictive fall will be active once the robots torso is tilted too much during the walk state. Here the robot uses a semi-damping mode to reach a standing position but also to prevent damages to the motors. Note that this behavior is inactive when STAND was pressed. If the robot falls in this state, it can seriously damage itself.
Handling the Robot
Note
Our prepare mode and walk mode are not Booster's prepare mode and walk mode. They are custom states within Booster's custom mode.
Gamepad Control
B-Human only
All gamepads are labeled with the name of the robot they are connected to.
Each Booster robot comes with a gamepad that is linked to that specific robot. The gamespads can be switched on and off by pressing the home button (K1) or the Logitech button (T1) for a longer time. For the connection to work, the receiver mode slider on the bottom side of the gamepad must be shifted to the right (not Bluetooth). In addition, the lower three LEDs above the button M must be on. If they are not, the button M can be used to switch the mode until they are.
The gamepad control can only be activated when the robot is in walk mode and the joints are stiffened. Pressing the left trigger and ⊕ on the gamepad simultaneously activates remote control. It can be deactivated again by pressing the left trigger and ⊖ simultaneously. The gamepad control will automatically be deactivated when the buttons F1 or STAND on the robot are pressed as well as when the gamepad is switched off. The latter will also happen automatically if the gamepad is unused for 10 minutes.
Connecting via Terminal
To connect to the robot, the directory Make/Common contains a login script. The only parameter of that script is the IP address of the robot to login. It automatically uses the appropriate SSH key to login. In addition, the IP address specified is written to the file Config/Scenes/Includes/connect.con. Thus a later use of the SimRobot scene Config/Scenes/<model>/Remote.ros3 will automatically connect to the same robot.
Several scripts are copied to the robot when it is installed with Install/installRobot. They are run be the script Make/Common/deploy, but can also be used directly through SSH:
-
bhumanexecutes thebhumanexecutable in the foreground. It handles redirecting the output to a logfile. Press Ctrl+C to terminate the process. Please note that the process will automatically be terminated if the SSH connection is closed.bhuman -dstarts agdbsession for thebhumanexecutable.bhuman -boption disables output to the console and is used by thebhumansystemd service. -
setprofilechanges the wireless profile. -
setvolumechanges the sound volume.
Another relevant command is:
systemctl --user start|stop|restart bhuman.servicestarts, stops, or restarts thebhumanexecutable as a background service. The scriptMake/Common/deployalways stopsbhumanbefore deploying. Ifdeployis started with the option-b, it will restartbhumanafter all files were copied.
Connecting via SimRobot
To connect to a real robot, open the scene Config/Scenes/<model>/Remote.ros3 in SimRobot, replacing <model> by K1 or T1 depending on the robot you are connecting to. A prompt will appear to enter the robot’s IP address.1 In a remote connection, the simulation scene contains a robot which mirrors the joint positions of the connected real robot, but otherwise experiences the dynamics of the simulation. All the other views work as usual.
-
The script might instead automatically connect to the IP address that was last used for login or deployment. ↩