Calibration
Autonomous Calibration
For the Booster Robots only the camera extrinsics is calibrated, which is further explained below.
Sometimes the joints also have a wrong calibration and would need a custom offset. For this there is currently no further process except for setting appropriated values in jointCalibration.cfg.
Camera Extrinsics
Place the robot rougly are this position. The robot must see the full goal area, ideally centered in the camera image.
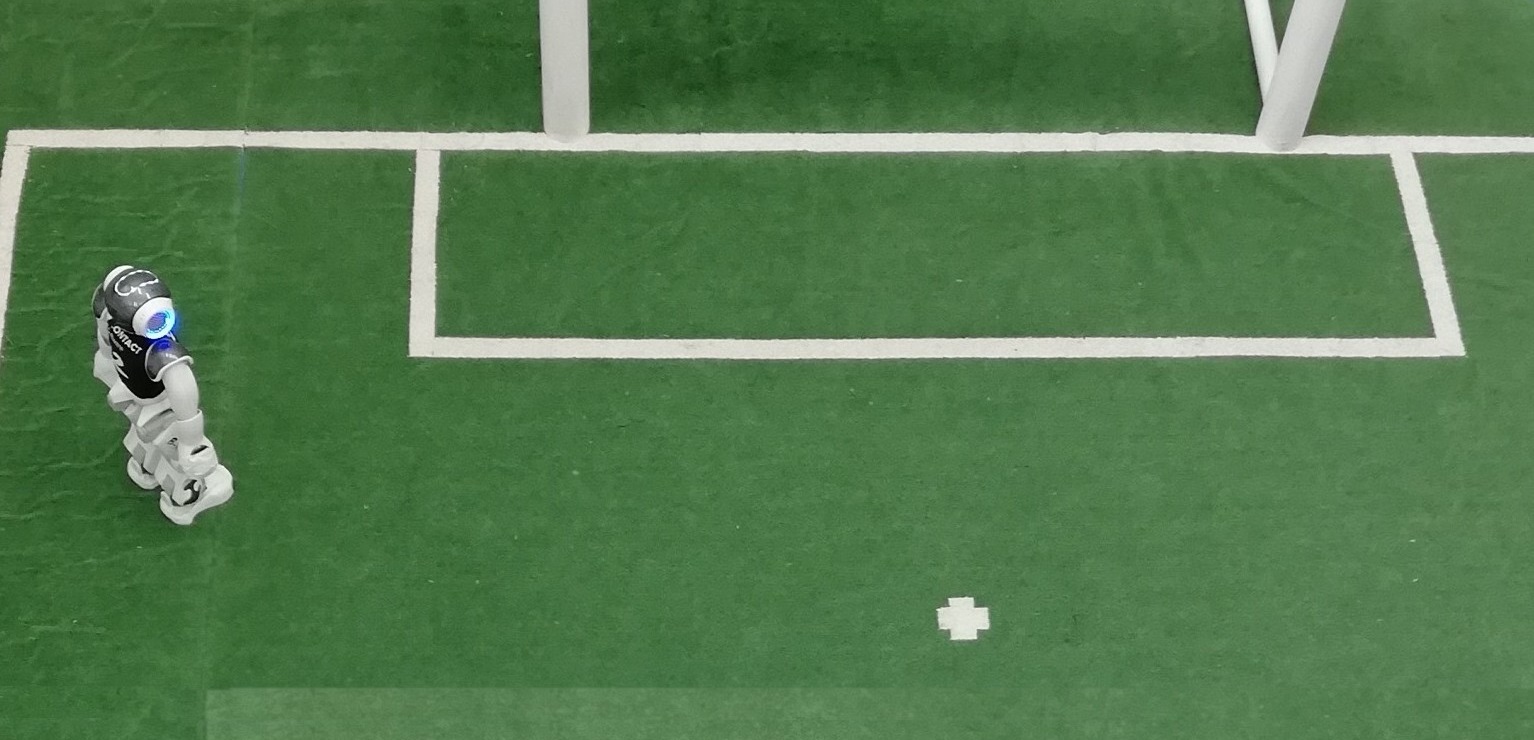
Connect to the robot with SimRobot and use the following command, which contains the debug request to start the calibration mode and further instruction:
call Includes/ManualCameraCalibration
Use Ctrl + LMB and Shift + LMB to select two points in the image. Those should be in the center of the edges of the lines of the goal area.
Use the other commands Ctrl + Shift + [I|J|K|L] in the instruction to map and save the four lines, as seen in the image below.
Once all four lines are marked, use the following hotkey to start the sampling process:
Ctrl + Shift + V
The robot will now create a sample for the calibration process and if successfull shortly afterwards turn its head to the next position.
Turn the robot manually (either by hand or with a joystick controller) until the goal area is centered in the camera image again and repeat the process.
After overall three configurations, the camera parameters will get optimized. The robot will say calibration finished and the resulting camera calibration will automatically be saved on the robot.
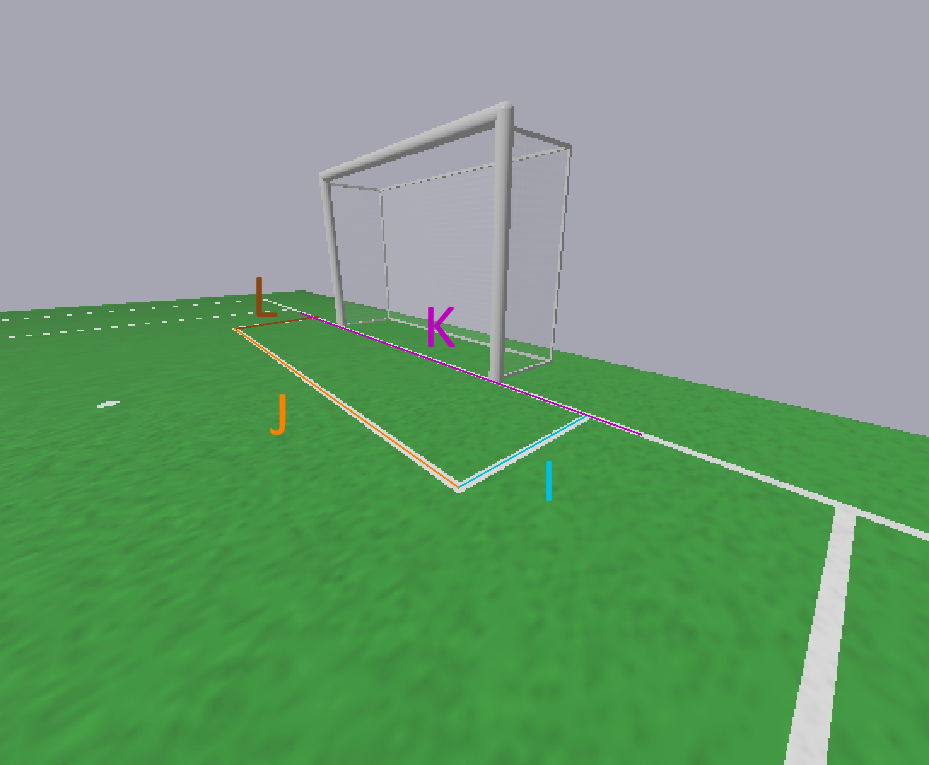
Note, that no matter which side you choose to do the calibration, the mapping of the lines is:
- I is the closest short line to the robot, that connects the goal line and the parallel line of it.
- K is the goal line.
- J is the parallel line of the goal line.
- L is the further away short connecting line, parallel to line I.
Keeping the Calibrations
The results of the automatic calibrations are stored on the robot. To keep them permanently, they must be transferred to your computer, so that they will be used again when the software is deployed again to that robot. This can be achieved by either using the context menu entry download calibration of the robot in the deploy dialog or by running the underlying script directly:
Make/Common/downloadCalibration <robot-ip>
Testing the Camera Calibration
Connect to the robot with SimRobot and the RemoteRobot scene. Place the robot at the sideline of a soccer field and penalize it, as if the robot would return from a penalty.
Use the controller to let the robot stand still and switch into the playing state. Set the head free (see this section).
Open the camera images and the view "worldState" for that robot. Now you can move the head around, from left to right and up and down and observe the projection from image to world space.
You can also freeze the RobotPose, to prevent the robot from localizing. You can do this with the following command:
get representation:RobotPose
You will receive a command set representation:RobotPose. Click it and press enter, to freeze the values.
This helps to see whether for example the line projections are misaligned when the robot looks over its shoulders.
If you want to move the robot around, use the following command to allow localization again:
set representation:RobotPose unchanged
Field Dimensions
The parameters for the field dimensions are located in the file Config/Locations/Default/fieldDimensions.cfg. Most values are relative to the center of the field. The x-axis points in the direction of the opponent goal, the y-axis to the left. The distances are measured from the middle of one line to the middle of the other line. The following drawing shows all the constants that can be adapted directly in the file (except for goalHeight). There are other constants that are computed from these ones, usually by negating them. For each constant containing Opponent there is one with Own instead and for each one containing Left there is one with Right instead.
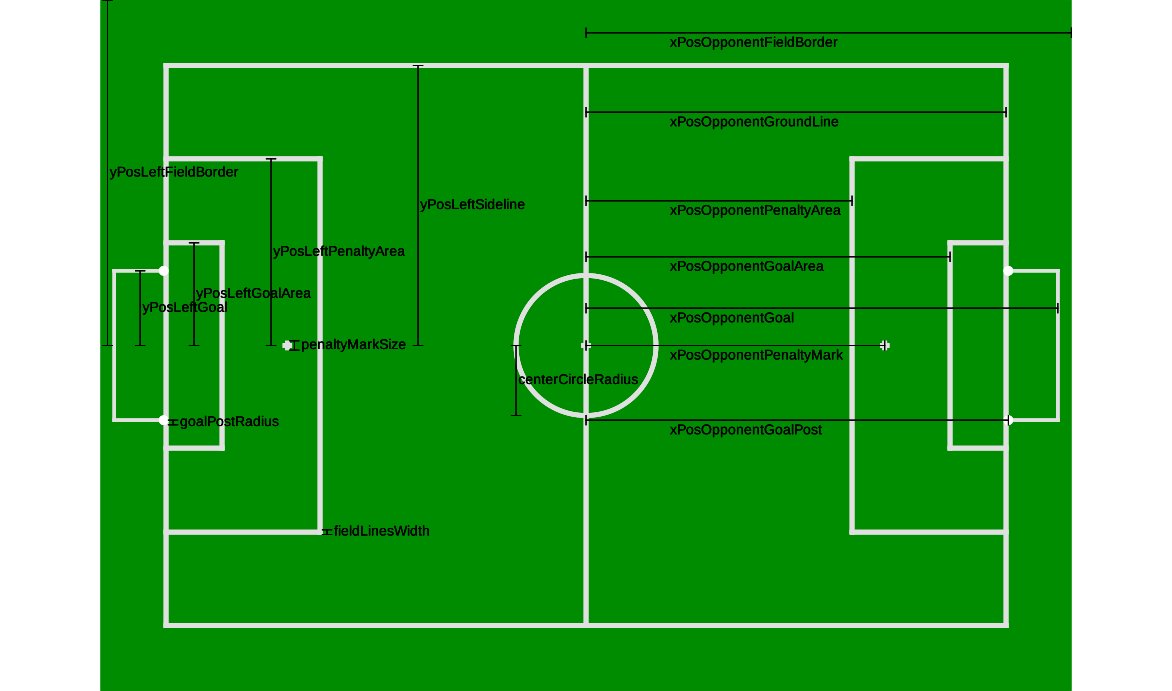
Parts of the penalty mark location must also be adjusted in the fieldLines array because they cannot be derived from xPos(Opponent|Own)PenaltyMark. Also note that although there is the symbol xPosHalfWayLine, large parts of our software can only cope with this value set to 0. Similarly, the code cannot really handle asymmetric fields, especially since this would be different between first and second half.
Odometry
The odometry describes how the robot is moving in the world based on the executed motion. For the walk, a factor is applied from the calculated to the actual motion. This parameter can be found in the file Config/Robots/Default/odometryDataPreviewProvider.cfg under the name odometryWalkScaling. Because the current odometry determination is based on the measured kinematics and not based on the requested one, we use the default values, i.e. 1. This means, we do not scale the odometry. In case a scaling is needed, i.e. the surface is very slippery, the parameter can be calibrated.
Connect to a robot via SimRobot and the RemoteRobot scene. Use the following command to set the location to only use the odometry:
for Cognition mr RobotPose OdometryOnlySelfLocator
Place the robot in a location on the field, the field coordinates of which are easy to determine, such as the center circle or a penalty mark. Then use the following command to let the robot know where it is standing on the field:
set module:OdometryOnlySelfLocator:basePose rotation = 0deg; translation = { x = -750; y = 0; };
The example values would place the robot on the center circle in the own half looking in direction of the opponent goal. Afterwards use the following command to reset the localization:
dr module:OdometryOnlySelfLocator:resetReferenceOdometry
Now let the robot walk around by using the call Calibrators/walk command and using one of the direction commands for the MotionRequest. After some distance use the stand command and use
get representation:RobotPose
to get the current location at which the robots assumes it is standing. Set the parameter odometryWalkScaling to match the real and assumed location. Afterwards place the robot on the previous position (i.e. the center circle), use the
dr module:OdometryOnlySelfLocator:resetReferenceOdometry
command to reset the localization and repeat the process as often as you want.