Deploy Dialog
The deploy dialog appears at the end of building the code for the Booster robot if the build target is run (CLion, Xcode1, Visual Studio Code) or the project Utils/deploy is built (Visual Studio). It allows to select the arguments for the script deploy (see this section) and some others graphically. In fact, the dialog can only be used through the script Make/Common/deployDialog, because the scripts that perform the actual work are executed outside of the dialog. Hence, their console output is written to the terminal in which the script Make/Common/deployDialog is run. When run at the end of a build job, this is usually the output window of the development environment. If the script is run manually, the name of the build configuration to deploy must be passed as the only parameter (Debug, Develop, or Release) and the dialog must have been built for that configuration (and the robot code as well if it should be deployed).
The deploy dialog is split into two halves, each of which again consists of two or three parts.
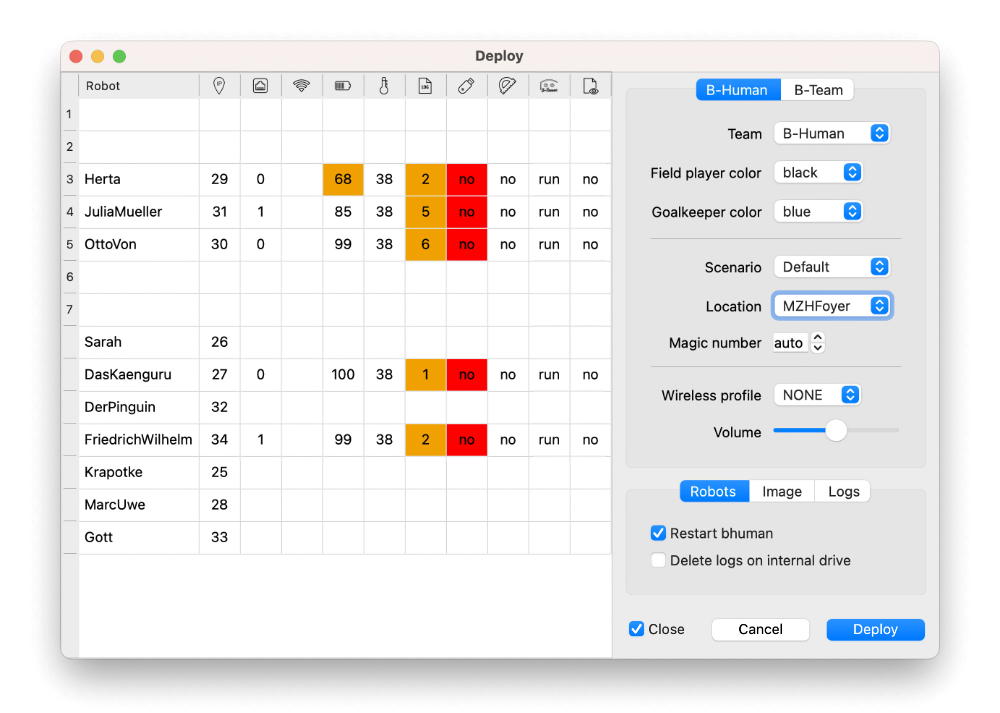
Robots Table
On the left side, all available robots are displayed with their current status if they are reachable in the network. The icons of the table header have tool tips that describe their meaning. Table cells are empty if no information is available. If they contain information, a cell background colored in yellow or red means that the cell requires attention. Such cells have tool tips that explain why the cell was highlighted.
The upper part of the table with numbered rows contains the robots the software should be deployed to. The number is the player number that will be assigned to them. The unnumbered rows contain the substitutes. Robots can be moved by drag and drop. In the upper part, robots can only be dragged onto a row. In the lower region, they can be both dragged onto a row or between two rows to insert them. If a robot is dragged onto a row that is already occupied, it will switch places with the robot present in that row. If robots are removed from a numbered row, the row becomes empty. If they are removed from an unnumbered row, the row will disappear.
If a robot is reachable in the network, a popup menu can be opened. It allows to open a terminal window to connect to the robot, open SimRobot (see this page) with the scene Config/Scenes/<robot type>/Remote.ros3 to connect to the robot, download calibration files if they were changed, (re)start the B-Human software or stop it, or shutdown the robot's primary computer (the robot still has to be switched off manually). The terminal window is opened through the script Make/Common/robotTerminal, which can be extended to open the preferred terminal application. For SimRobot, the binary is chosen that was compiled most recently. The command will silently fail if none is available.
Settings Area
Team Configuration
The right half consists of two tab groups and the main dialog buttons. The first tab group defines the configuration that is deployed. Its contents stem from the file Config/teams.cfg. There can be settings for multiple teams. Each is shown in a different tab. Each team also has an assignment of robots to player numbers. These are shown in the numbered rows of the robot table. Please note that if you are missing a robot, it might be assigned to a team that is currently not shown. The meaning of most fields should be obvious if you read this section and this section . The magic number is a value that all robots on the same team share. It prevents accepting network packets from other teams that misconfigured their robots. auto means that the deploy script will pick one automatically.
The tab bar has a popup menu that allows to duplicate the current tab, delete it, or rename it. The tabs can be reordered by drag and drop.
Deployment Mode
The second tab group defines the deployment mode and parameters that are specific to one of the two modes available. The first mode is to deploy robots. The software is sent to the robots in the numbered rows of the robots table. It can be decided whether or not to restart the software on the robots again after it was deployed. It can also be requested to delete all log files from the robot when the deploy script is run.
The second mode does not deploy the software, but handles the log files on the robots instead. They can be downloaded and optionally deleted afterwards. It is also possible to delete them without downloading them first.
Executing the Action
Pressing the button Deploy, Download, Delete, or pressing the enter key sends the software to the robots, downloads the log files from the internal drive, or deletes them, respectively. In addition, all changes made in the dialog are saved. If the software is deployed to the robots, it will be sent to all robots of the currently selected team that were placed in the numbered rows of the robots table, even if they are not reachable. In that case, the script deploy will report that it could not reach them. This should avoid that the deployment to a robot is suppressed without any notice. If Close is checked, the dialog will close afterwards. The next time it is opened, it will be in the same state as it was left.
Pressing the button Cancel, the escape key, or the window's close button closes the dialog without deploying the software. If the settings were changed since the dialog was opened or the last time they were saved, you will be asked whether they should be saved before closing the dialog.
-
On macOS, the deploy dialog can appear in front of a fullscreen Xcode or Visual Studio Code. To support this,
/usr/bin/archmust be allowed to access the "System Events" both under "Automation" and "Device Control and Data Access" in the privacy settings of macOS. ↩